My mama taught me that you always write a thank-you letter when someone gives you a gift, particularly if it is someone that you do not see very often. This wasn’t my favorite task as a child as I’d rather be playing with my new toys than practicing penmanship but I grew to enjoy it as I got older. “They” say it is better to give than to receive but I have to agree with my children on this one – they are both equally nice! No, no, I am kidding. Honest to goodness. But when you do receive something, letting that person know how much you appreciate the gesture and expressing how their giving made your day can be priceless.
What is all of this about? Well, Christmas has just passed. My daughters were beyond spoiled by friends and family from both near and far. So you can probably take a guess as to what we have been doing recently… why, writing everyone thank-you letters, of course! My 10 year old is now well-versed at addressing envelopes (and finally has our address memorized!) and my 4 year old can write her name like a champ! Everyone benefits here.
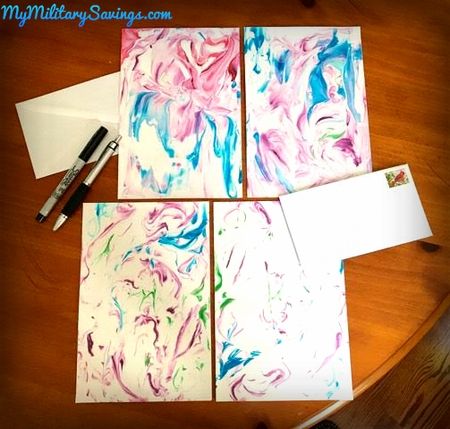
We went through a few greeting cards before deciding to try something a bit more fancy. My oldest daughter has a pretty, marbled notebook that inspired us to try and make our own marbled paper!! It was a SUCCESS! It made finishing off our letters more exciting and I won’t lie to you, I made more marbled paper when the girls were in bed for my own private stash!
This project is so fun and the applications can go beyond stationery. What about using this for scrapbooking? For the background of a frame if your photo doesn’t completely fit? You can marble envelopes or any paper product you can get your hands on! Recipe cards… because, why not?
You need TWO basic ingredients – foam shaving cream and food coloring. Plus a thick paper, of course. I used paper meant for acrylic paint but you can find all sorts of different types to choose from at your local craft store or even Wal-Mart. (You can use a thinner paper, such as an envelope, but you have to be careful with how long the paper is saturated by the shaving cream.)
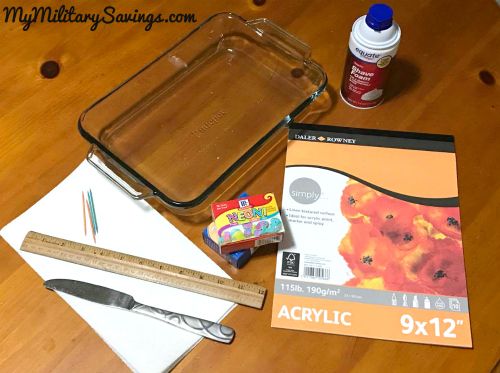
If you are planning on giving this a try, these are the things you’ll need to begin:
- Your paper product of choice (preferably a thick paper – I chose Acrylic)
- Foam shaving cream
- Food coloring
- A pan or dish large enough to fit your paper inside of
- A ruler
- Toothpicks
- Paper towels (or towel if you don’t mind it being stained by the food coloring)
- Knife or spatula to mix with
- Tape (optional, not pictured)
Step 1) Fill your dish with shaving cream. Add a few drops of your base color and very gently swirl around to create a marbled look. Do not over mix – the paper will appear more marbled than what you see in the dish. Add a few swirls of your accent colors by dabbing the toothpick in the food coloring and then swirling it into the shaving cream. Be careful to not mix colors or you may end up with undesirable shades, unless brown is your intention. 🙂
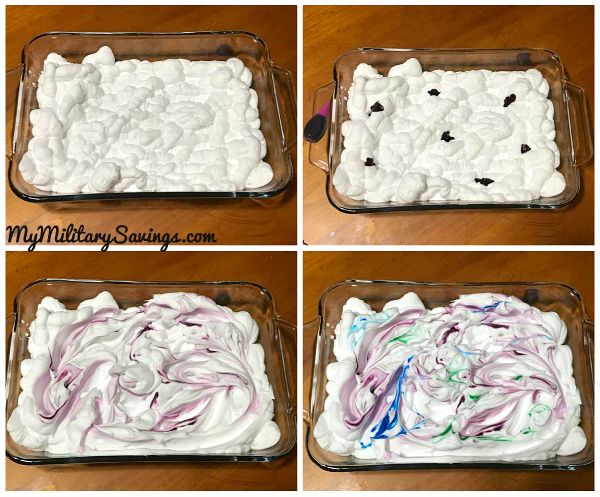
Step 2) Put a piece of tape on the back of your paper so the sticky side is facing the front. This will serve as a tab to help you remove the paper from the dish. Then stick the paper into the shaving cream and push down to make sure there is full contact on the front. Allow this to sit for a few moments (here is where you will need to be careful if using a thin paper) and then using your tape tab, or by grabbing the corner, remove the paper from your dish in a sweeping motion so you scoop up some of the shaving cream with it. This is how the paper will become more marbled than what you had seen in your dish.
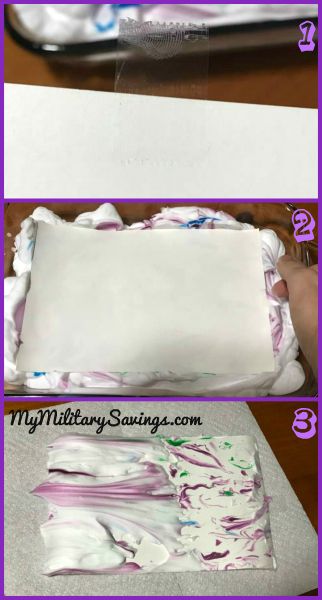
Step 3) Using a ruler, scrape all the excess shaving cream off in one motion and then wipe the paper with a paper towel to dry it off.
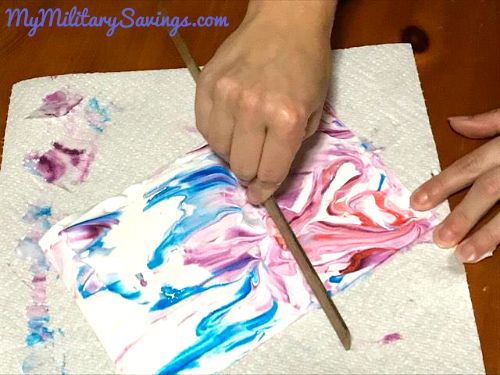
You can see in the photo below that one of our papers appears less marbled than the others. This is because I did not scoop up a lot of shaving cream with that particular piece of paper as I pulled it out of the dish. As the ruler wipes the shaving cream off it is spreading the food coloring as well.
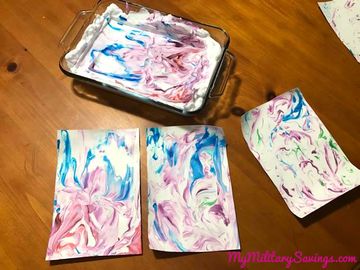
Allow your paper to dry and then set under a stack of heavy books for a few days to flatten it out.
It’s that simple! And so fun! This craft is kid-friendly although will require supervision and a bit of help. My daughter got so creative… I now have piles of books all over the house flattening out her many different projects. 🙂
I’d love to see your creations! Share you pictures below!
For additional fun family crafts and DIY projects, visit MyMilitarySavings.com!