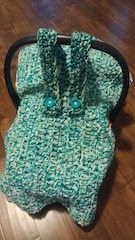
Creating your own car seat cover is much simpler then you think. You can make it as simple or elaborate as you would like. You can change the colors to match any theme or gender preferences. The car seat cover is convenient to keep your newborn covered and cozy. For this car seat cover I only used double crochet (DC) and half-double crochet (HDC) stitches.
What you need:
- Size Q crochet hook
- Size P crochet hook
- Yarn of your preference
- Scissors
- Buttons (your choice)
- Threading yarn
- Sewing needle


What to do:
- I used 1 strand of each colored yarn in the size Q hook.
- I chained 56 to start my cover. However, chain as many as you think you will need to cover your car seat.
- DC in each chain stitch. DC 22 rows (at least) to cover the width of the car seat.

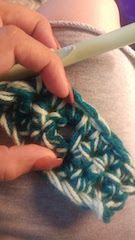
- I then took my size P hook and chained 30. HDC in each stitch across. HDC 30 stitches for 3 rows. Towards the end of the 3rd row (I had 4 stitches left), chain 2 and HDC into the next stitch.
- On the last and final row, place 2 HDC into the chain 2 space. This will create a hole for your button. I bought larger buttons so this size hole worked perfect.

- You then need to figure out where you want your straps to hang on the car seat. This is completely up to you. I sewed on my straps with threading yarn. I lined up my buttons and sewed those on as well.
- Once your straps and buttons are sewed on you are done!