Here’s my struggle – I feel like I lug our two ton decoration boxes out of the attic for every holiday season… and as soon as everything is put up then it’s already time to take it down and put away again! It’s discouraging when holidays near because instead of the excitement to decorate and feel festive, I am already dreading the clean-up work. In fact, my Christmas decor is usually up at the very beginning of November so I can enjoy the lights and tree for a solid two months before heaving everything back up to the attic. Then of course I hear the complaints that “I skipped Thanksgiving” but it’s like, sheesh people! We can have a Thanksgiving and still sit around a fireplace decked out with stockings and snowmen! What’s the big deal!? 🙂
Anyway, this year I am trying to prepare a bit more in advance so I have adequate time to doll our house up for each approaching holiday so we get the full experience of fall, then Halloween, followed by Thanksgiving (I’m gonna try it this year!), and lastly Christmas. To me, that meant finding a few key pieces that can be left out for more than one holiday. For example… my country themed, no-carve pumpkins!! Pumpkins are totally relevant to Thanksgiving and of course they are a staple for Halloween as well so *BOOM*! I found my porch centerpiece that I can leave out for two whole months. That’s totally my style!
No-carve pumpkin decorating is definitely “the new thing” because the pumpkins don’t rot and fall apart within a week as they do when you cut them open. Even dipping them in bleach concoctions and whatever else you may find on Pinterest won’t save them long enough to last the entire holiday. Plus, with little ones, carving anything sounds fun but completely ends up being a project for Mom or Dad. You worry about them holding the knife, and then some kids don’t like getting their hands dirty to scoop out the insides and then, yeah, NO. I wasn’t doing that this year. But I am in love with old country themed everything, so I stumbled across a photo of pumpkins similar to these and I didn’t even think twice. These are both my Halloween AND Thanksgiving decorations, wham bam thank ya ma’am!
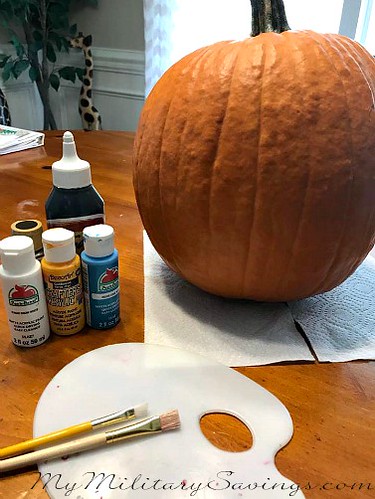
You literally need pumpkins, and paint. Oh and foam board or thick paper for fox ears, plus a hot glue gun to secure them. That’s it!
For the Fox Pumpkin:

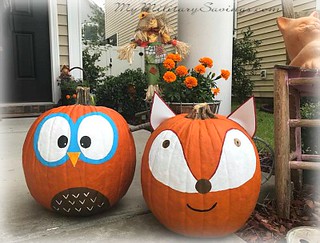
I chose to paint the fox eyes WHITE with a DARK RED outline, with a BROWN nose and eyes, and a BLACK mouth. Grab those paints and get started…
Step 1) Use a piece of scrap paper and trace out the shape (lightly with pencil) that you want painted around the eyes. This way you can flip the paper over and make the other side identical without too much hassle.

Step 2) Paint that section WHITE. Apply second coats as needed.

Step 3) Outline the white around the top edges with DARK RED and color in the nose BROWN and add BROWN eyes. Use a drop of BLACK for pupils and to make a simple mouth.

Step 4) Cut out ears using foam board. I rounded the bottoms so the foam would sit flush on my round pumpkin. Outline the tops of the ears with DARK RED. Then hot glue to the top of your pumpkin!


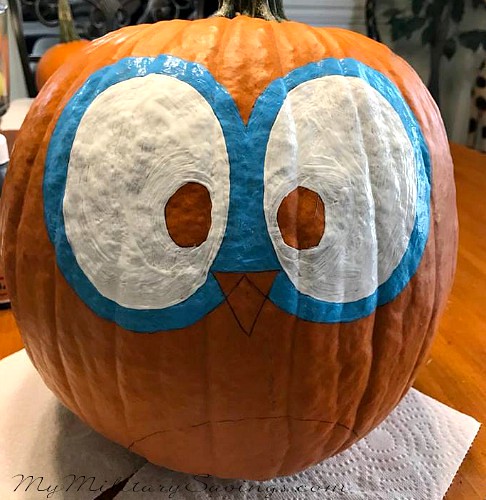
Now for the owl I chose to use a bright, LIGHT BLUE and WHITE for the eyes (with BLACK pupils), YELLOW for the beak, and BROWN with WHITE for the feathers on the belly…
Step 1) Sketch out the basic shape of your eyes like the photo below. I was frustrated that my pencil wasn’t showing very well (I couldn’t find my sharpener!) so I decided to use a pen BUT in hindsight, the pen marking is much too dark and hard to cover with paint. Stick with pencil.

Step 2) Add in the pupils and nose and belly like the photo below.

Step 3) Begin painting, starting with the BLUE outline and filling the inside with WHITE. Apply second coats as needed.
Step 4) Color in the nose YELLOW and belly BROWN. As you can see in the photo below, it is extremely hard to cover up pen mark with yellow. Grrr. Lesson learned!
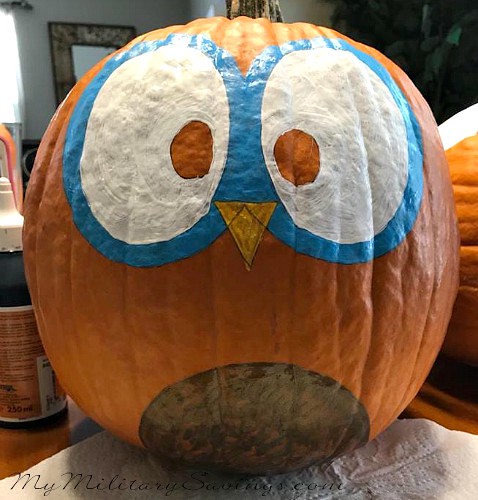
Step 5) Fill the pupils in with BLACK (I added another little drop of WHITE because, well, I don’t know. It looks good.) and add little WHITE “V” shapes to the belly for feathers.

And that’s all there is to it!! Find the perfect spot to show your beauties off!
What other animals would you paint? How about a deer with sticks for antlers?? My daughter wants to try a cat, too… Maybe next week!
For more fun holiday themed arts and crafts and DIY projects, check out MyMilitarySavings.com!!