This whole month we’ve been concentrating on getting our kids ready for school and preparing them to have the best year ever! Today, I have a fun little experiment to stretch those brain muscles that have been lounging on the couch all summer (at least in my house they have!) My boys love anything to do with rocks, minerals, and geodes so I found an EASY experiments on how to make our own crystals! It was easy, fun, and fast! Check it out!
Supplies:
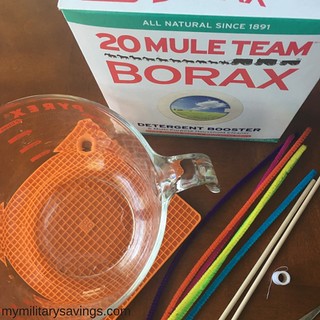
- 6 cups of boiling water
- 3-4 tablespoons of Borax per cup of water
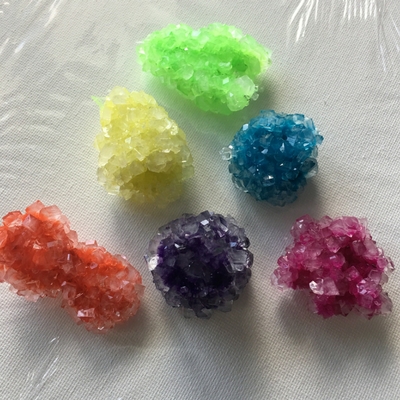
- Pipe Cleaners, one for each crystal. I made six. Colored pipe cleaners will give you colored crystals, or you can use white & add food coloring, if desired
- Two wooden dowels, long spoon handles, or kabob sticks. Anything that the pipe cleaners can hang from
- A large glass bowl or measuring cup
To begin, roll or scrunch up your pipe cleaners while the water is boiling. I made different shapes and honestly, they all worked! Tie your thread around each one and then tape the other end to your wooden dowel. You want to make sure the pipe cleaners aren’t touching each other or the bottom on the dish.

Working with 3 cups of boiling water, add 3-4 tablespoons of Borax per cup of water and stir. You’re looking for complete saturation, which means the water the water cannot absorb or dissolve any more of the Borax powder. I added Borax until I had a small pile in the bottom that would not dissolve. Add in the other 3 cups of water (I left it simmering on the stove) and more Borax until your saturated solution is complete. If you’re adding food coloring, now is the time to do it.

Gently add your dangling pipe cleaners. My yellow pipe cleaner fell off almost immediately, of course! HA! It did not affect the crystal process, other than it was a bit hard to pull off the bottom.

I read hot water makes the best crystals so I covered the dish with a towel to slow the cooling process. After just a few hours, you can see the crystals forming! As the water cools, the Borax settles out of the water molecules and begins to bond with other Borax molecules, thus forming the crystallization!

Let them sit overnight and you have your very own crystals. Let them dry on paper towels and cut away the excess thread. You can seal them with a clear sealant or even clear nail polish, if desired.

They’re so pretty to look at and study! I bet they’d make a great paper weight for your new teacher. 😉 I hope your kids have as much fun with these as mine did!!