
Chances are you are 1 of 4 different types of Christmas people:
- You don’t do Christmas cards at all. If you receive them, great, but you’re definitely not concerning yourself with sending them. “Ain’t nobody got time fo’ dat.”
- You grab a pack of Christmas cards when you happen to stumble upon them at the store… if you happen to stumble upon them at the store… and you get to them when you get to them. Sometimes a little late. But better late than never is your motto.
- You type up the standard “This Year in Review” newsletter to fill everyone in on what’s been happening with your family and to prevent having to write anything personalized in individual cards. ‘Cause handwritten letters are so last decade.
- You buy the matching outfits for your spouse and kids and you set up a photo shoot with your dog sitting in the front so you can send family pictures to everyone in your address book this Christmas, because of course all of those third-cousins-by-marriage want to put your photo on their fridge!
So… which one is it!? 🙂 I find myself between 2 and 3… it solely depends on my daily intake of caffeine that particular December. This year I happen to be on a 2-3 cup a day average so I’ve stepped it up a notch and decided that YES, I am going to send out Christmas cards… on time! And although I’m not putting together a family newsletter because, quite frankly, 2017 sucked… I am going to put a touch of personalization in each card. Because I am still thankful to be alive and for my family’s health and I do still love everyone (most everyone) listed in my address book so I want to show that I care. I am a good person. Most days. Depends on how many espressos I’ve consumed. Enough about me, let’s just get to this.
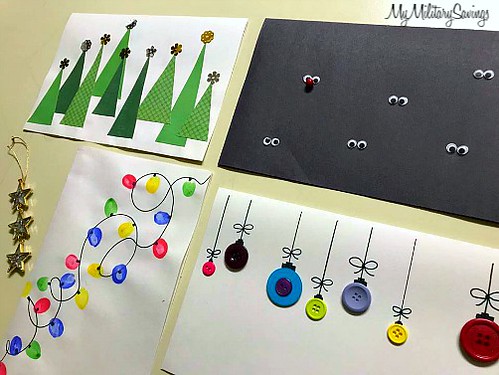
Homemade Christmas cards!! That’s where it’s at! Let’s put Hallmark out of business and keep our kids busy by doing these things ourselves! They can be funny, cute, sweet… whatever tickles your pickle. I’m going to share with you 2 traditional cards that I made, 1 sentimental card, and 1 funny one. At least I thought it was funny. You tell me what you think!
This is what you’ll need and the instructions for each card:

Fingerprint Lights card-
- White paper or card stock
- Black marker
- Different colored finger paints or non toxic poster paint
Step 1) Fold your paper in half and using a black marker, draw a bunch of swirls to resemble a strand of Christmas lights laying around.
Step 2) Add little black squares along the line where you want to place your “lights”.
Step 3) Using different colored paints, stamp your kiddos fingers at each square.
Step 4) Add something cutesy about “May your holidays be merry and BRIGHT.” 🙂

Ornament card-
- White paper or card stock
- Black marker
- Different colored buttons
- Glue
Step 1) Fold paper in half and set buttons on the paper (stagger them) to get an idea of where you want your ornaments to be placed.
Step 2) Above each button, draw a straight black line down from the top of the card. Then add a small black rectangle at the very end of each line and draw an even smaller black square on top of each rectangle. Add a bow a few centimeters above the black square.

Step 3) Glue the buttons in place.

Christmas Tree card-
- White paper or card stock
- Different shades of green paper (I used 3 different colors)
- Scissors
- Snowflake or star shaped spangles to top each tree
- Glue
Step 1) Fold the white paper in half. Cut out different sized triangles out of each different colored green paper. I cut 3 trees out of each (3) different colored papers.
Step 2) Glue the trees down starting about halfway up the card. These will be the trees in the very back and as you glue trees on top of them, they appear to be coming closer to you. Dimension, it’s all about dimension.
Step 3) I was too excited and forgot to take a photo of the final step, but glue a spangle to the top of each tree!

Reindeer After Dark card-
- Black construction paper or card stock
- Googly eyes
- Red craft ball, or pom pom, or fake berry
- Glue
Step 1) Fold paper in half. Glue sets of googly eyes on the front of black paper.
Step 2) Add the red ball, pom pom, or berry underneath one set of eyes.
Step 3) Write something cutesy like “Reindeer After Dark.”

The reindeer card is the one that I found funny, in case you were wondering, but I did show it to my mother and her response was, “What, did you run out of noses?” ……… It took her a second to realize that it was supposed to be RUDOLPH and there is only ONE Rudolph, and he is the one that LIGHTS Santa’s sleigh, which is why his nose GLOWS… So, you know your family better than I do. Send this card to someone that will “get it.” 🙂
And there you have it! Save a couple bucks, have a bit of fun, and send some smiles to your loved ones!
I’d love to see your creations and what other cards you may come up with. Share your photos with me in the comments below!!
For more fun, family crafts visit MyMilitarySavings.com!!