Ohmygoodness, the craze of new trends these days! My 5th grader came home from school a few weeks ago ranting and raving about the new toy that has apparently taken over the nation… <drum roll> the fidget spinner. I had no idea what she was talking about but apparently, all of a sudden one day at her elementary school, EVERYONE showed up with these things. She was trying to explain how it worked to me; it’s this metal thing you hold in your hand and spin in circles with your fingers. I didn’t understand the awesomeness of this but she insisted that I take her to buy her own. Because I had errands to run anyway, we jumped in the car that evening and searched all around our little town. Our local pharmacies were sold out of fidget spinners! I suppose that’s when it hit me that in their little eyes this thing must be the equivalent of getting a cell phone for their birthday or something. Which my daughter won’t be receiving for many more years, but anywho. Everyone wants one, everyone that has one is so cool, and everyone’s running about trying to find the perfect one.
We conceded that purchasing this gadget online was the best option (or perhaps only option in our small town case) but having raised my daughter to be frugal and conscious about her spendings, she chose the cheapest fidget spinner that she could find (only $3!! SCORE!) … This also meant that it had to travel from Hong Kong to arrive at our doorstep and would take approximately a month for delivery. She knew what she was getting herself into. I don’t know why she made such a big deal about it every day after. Yet everyyyyy singgggle dayyyyy until this thing arrived in the mail she was rushing to greet our mail lady in hopes that she may have made a deal with the Mail Gods to finagle this toy to us early. Everyyyy singgggle dayyyy when our mail lady just shook her head I had a pouting 10-year-old stomping around because “life is so unfair” and she thought she couldn’t live without a little metal spinning thingy that she hadn’t even had the pleasure of owning yet. I need to clarify that she completed the transaction online by herself, with just a little help. This wasn’t a case of Mommy-being-too-cheap-to-order-a-decent-one-that-would-be-shipped-in-one-week. Just throwing that out there.
In the meantime we found a suitable replacement. Why? Because parents do what they can to make their children happy. I didn’t buy an alternative- I didn’t purchase anything, actually. I had everything on hand to create our own DIY Fidget Spinner. This could be used as a substitute, or as an additional fidget thingy to add to their collection. What is most important is that it works annnnd it’s unique in that you can’t buy these at the stores! If you show one of these to your buddies, guaranteed they’ll want one, too.
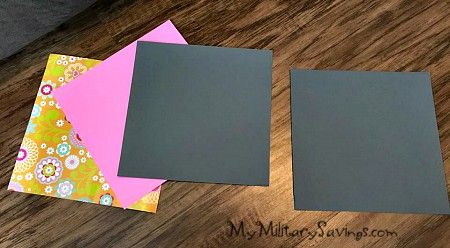
All you need is 4 sheets of origami paper (6″ x 6″), a small piece of cardboard, and a toothpick. A hot glue gun would be useful at the end but is completely optional.
You will be creating an origami Ninja Star and I will walk you through each step. I have also included a link to a video tutorial at the end of this blog if it is easier for you to follow that way.
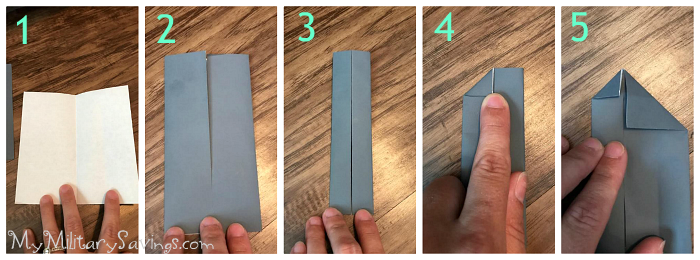
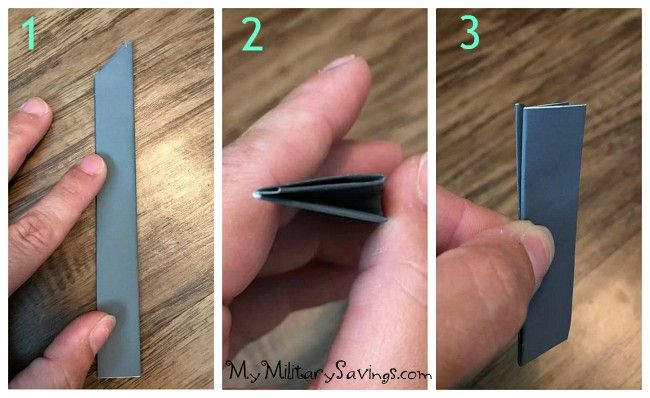
1) Take a sheet of origami paper, turn it upside down, and fold in half. Unfold it back open (photo 1) and then fold in the left side to the crease line at the middle and fold in the right side to the crease line at the middle (photo 2). Then fold the left side to the crease line at the middle AGAIN and do the same with the right side as well (photo 3). Once your paper looks like step 3 in the photo below, you will fold down the top left corner to the middle crease line to create a little triangle (photo 4). Then take the right side, unfold the vertical flap one time so the right side now looks like it did in step 2, and fold the top right corner down to the middle crease line to create a larger triangle (photo 5).
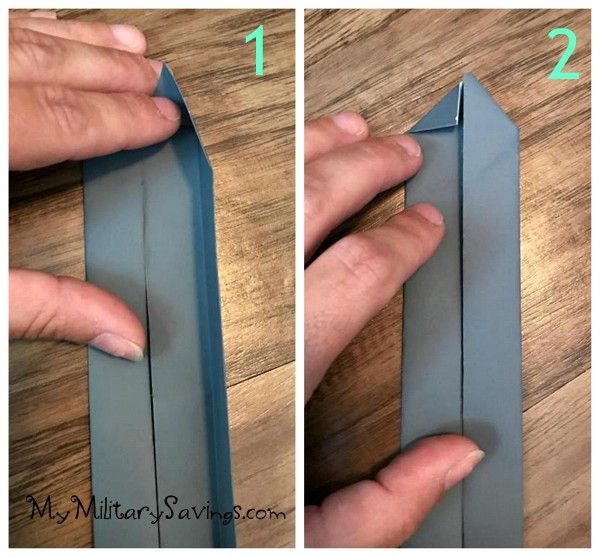
2) This next step is the trickiest part of making this whole DIY Fidget Spinner. Use your left hand to hold down both the small triangle at the top left and the top portion of the large triangle at the top right. Using your right hand, lift up the outer edge of the right side so it folds back inwards on the crease line (photo 1) and use your left hand to work the top section down into a point (photo 2). This may take a few attempts – take your time.
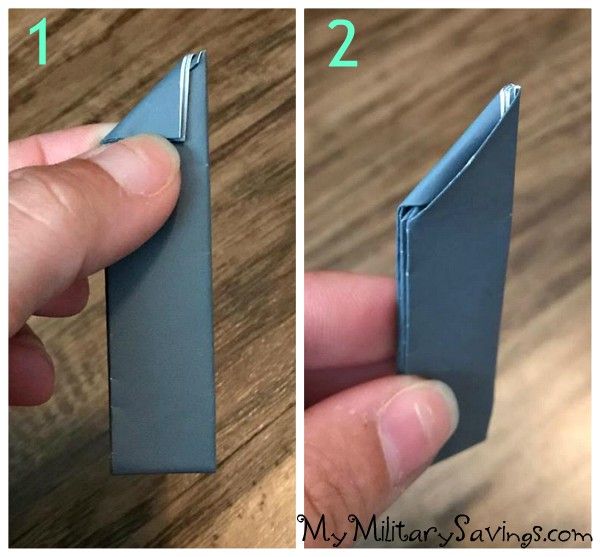
3) Now fold your paper strip inwards in half so you have what looks like photo 1 below. Hold the pointed tip up so you can see down into it (photo 2) and make sure that the edge with a slot in it is on the backside away from your body. Now fold this strip in half taking the bottom and bringing it up towards you (photo 3) so what was a 6″ strip is now about 3″. The top of one side of this strip is flat across as seen in photo 3 but behind this on the other side is that angled tip.
4) Take that flat edge and fold it down over the pointed tip behind it (photo 1). Then stick the ends of the paper into that slot that you had found a few steps above (photo 2) and this will secure this end for you.
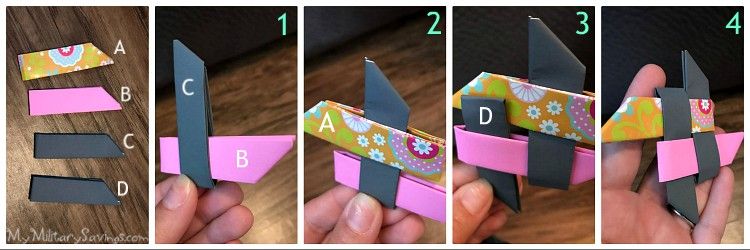
5) You will repeat this whole process for the remaining 3 sheets of origami paper until you have four 3″ pieces of pointed paper strips as you see in the photo below. Lay all 4 strips down until positioned like I have them below. I have labeled them A, B, C, and D for this next step.
Take strip B and stick it through strip C (photo 1) with the pointed edges facing up and to the right. Then stick strip C through strip A (photo 2) with strip A’s pointed edge facing left. Slide strip B to the left a bit to allow room to insert strip D up through strip B with the pointed edge facing down (photo 3). Then take the pointed edge of strip A and insert it through strip D (photo 4). Push all the pieces together snugly and you have completed your Ninja Star!
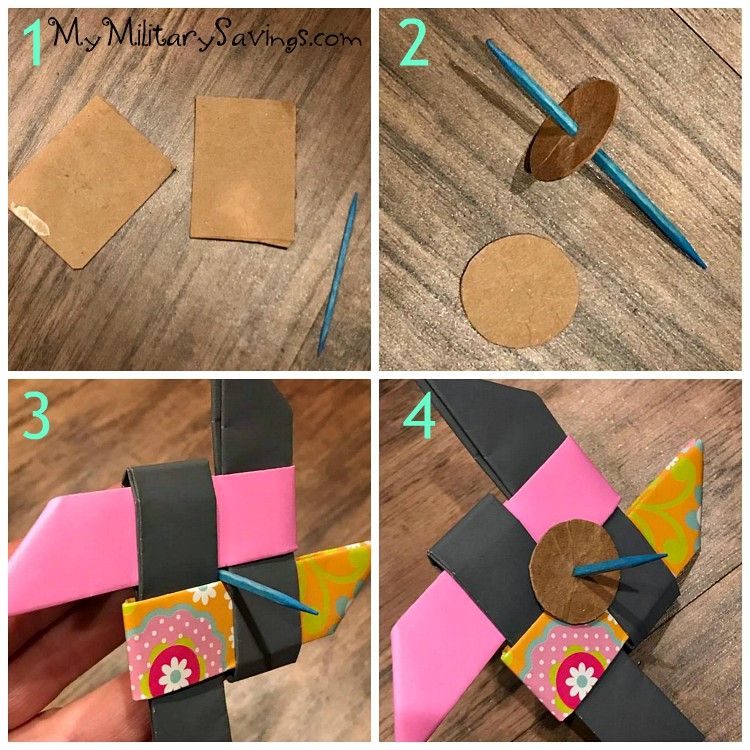
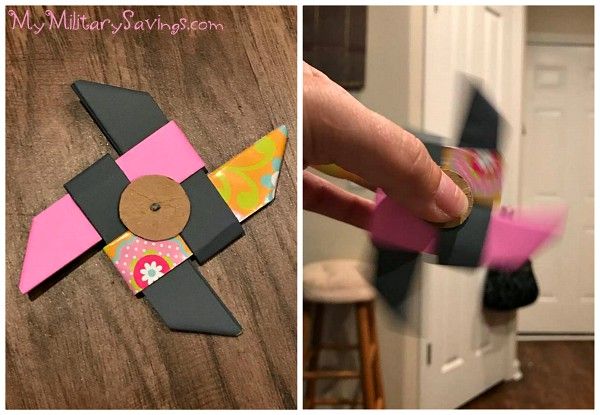
6) Now you simply add your rotating piece to the middle of your star to allow it to spin. To do this, you will need the cardboard and a toothpick (photo 1). Cut two small circles out of the cardboard and insert the toothpick through each one to create a hole in each piece (photo 2). Play with the ninja star to open a small space in the middle of it to allow the toothpick to pass through (photo 3) and then place a cardboard circle on each side of the star (photo 4). You will have to play with it and spin it a few times to get a feel for how tight you want to put the cardboard against the star – you will need some room to allow the spinning action. When you get it how you want it, cut the extra toothpick off of each side. At this point I’d recommend securing the cardboard with a dab of hot glue, and even securing the strips of origami paper exactly as they are around the toothpick to keep them from moving around with use. This is completely optional!
And there you have your completed, DIY fidget spinner made with origami ninja stars!! Perhaps you’ll start the next trend with THESE!
If the step by step photos were unclear, the video below is an outstanding tutorial on the origami star.
I promise it is not as hard as it may sound. Get the kids involved… get them folding!! If you do not have origami paper on hand, cut down a piece of regular computer paper to a 6″ x 6″ size and go from there. For smaller hands, try a smaller sized paper! Decorate it with markers. Get creative 🙂 I’d love to see what you come up with!!
For more family-friendly crafts and projects, subscribe to MyMilitarySavings.com!
MyMilitarySavings.com was not compensated by the company, service or product mentioned in this blog. This is strictly the honest opinions, findings, beliefs, and/or experiences of the author. The views and opinions expressed in this blog are purely the bloggers’ own. Any claims, statistic, quotes or other representation about a product or service should be verified with the manufacturer, provider or party in question. MyMilitarySavings.com is not liable for any risks injury or illness that may occur if you choose to act upon the bloggers’ suggestions stated in this blog.