My daughter has always loved butterflies which I find pretty symbolic considering how she has gone through the most beautiful metamorphosis herself over the past four and a half years. She starts big girl school this year, she had her first drastic haircut a few months ago, she wants the training wheels taken off of her bike this summer and she now prefers showers over baths! She’s ending that larva stage and has become quite the pupa! I’m afraid to blink sometimes because I don’t want to miss a thing.
When she asked me to paint her a butterfly picture for her room I decided to take it a step farther. I wanted to create 3D butterflies that would appear to be flying around her bed! This may sound ambitious and appear to be a tedious, pain-in-the-neck project but I promise it is totally doable. Tedious, yes, but hard? Not in the least!!
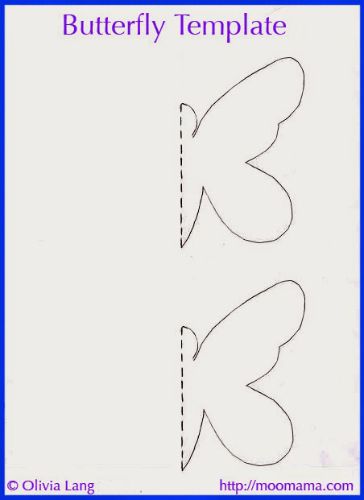
All you need is card stock and a printer to print off these butterfly templates that you can find here from MooMama! Grab some scissors, a pencil, and tape and you’re already half way done! Sorda kinda not really but gathering all of your materials is a step closer to being done… look at it that way. 🙂
Step 1) Visit MooMama to print out your butterfly templates that will look like this-

Step 2) Trace the butterflies that you print out onto your card stock. I traced one butterfly onto card stock and then used that as a more firm template to continue tracing more butterflies onto the rest of my paper. MooMama also provides a smaller butterfly template so I do recommend using both sized butterflies for a nice variety. How many butterflies you will want to cut out depends on the final design that you want to make. Google “3D butterfly wall art” for inspiration!
My munchkin has had this 3D butterfly art in 2 houses now (another perk – these little guys are reusable!) so we have played around with 2 different designs. The first butterfly wall that I made her looked like this:

That required approximately 150 butterfly cut-outs and you can see we chose to use rainbow colors that (kind of) faded in to each other. My daughter was OVER THE MOON with this.
Now that we have just recently PCSd we tried something a little different, only requiring about 55 butterflies but again using the rainbow colors that blend into each other.

Step 3) Once all of your butterflies are cut out, bend the wings at the base to make them 3-dimensional.

Step 4) Lastly, secure your design to the wall using tape or an adhesive putty.
This heart design is my personal favorite. I plan on adding more around her windows as if they are blowing in the breeze…

See that Driftwood Bird Mobile hanging in the corner? In case you missed my DIY tutorial on that, check it out here!!
So how did your 3D butterflies turn out? I’d love to see them!!!! Share all of your photos and comments below!
For more DIY projects of family friendly crafts, follow me at MyMilitarySavings.com!


