My whole house is decked out with paintings and photographs of trees – both my husband and I love the woodsy feel to it and I think seeing the beauty of nature all throughout my home helps me to relax as well. Call me cooky but yeah, I’m a tree hugger. Like, literally. I love trees. 😉
One of my other favorite things (besides raindrops on roses and whiskers on kittens… ha) is simple craft projects that look chic and trick you into thinking that it took a lot more effort than it really did. It’s like finding a fantabulous outfit from the thrift store that cost you $10 but you wear it and feel like a million. Ya know?! This Birch Tree Canvas is exactly that… an insanely easy craft that I think looks store-worthy once it’s finished. I’m pretty sure I would have bought this if I found it at my favorite craft spot and didn’t know any better, that it can simply be recreated! So. The cat is out of the bag. Save your moola and craft this up yourself!
The trick to EASY birch trees is an old credit card. Or ID card. Or whatever card you don’t need anymore. You use this to scrape black paint along the edges of your trees. Bam. Whoda thunk?? Stay with me here… I’ll explain it all.
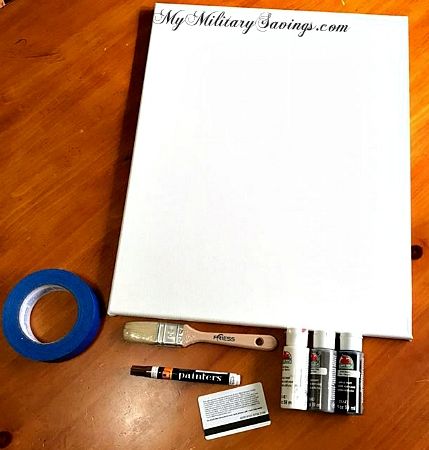
This is what you’ll need for this project:

- A canvas (I used an 18″x24″)
- Painters tape or masking tape
- An old credit card
- Acrylic paint in colors of your choice (for the background) and black (for the trees)
The how to:
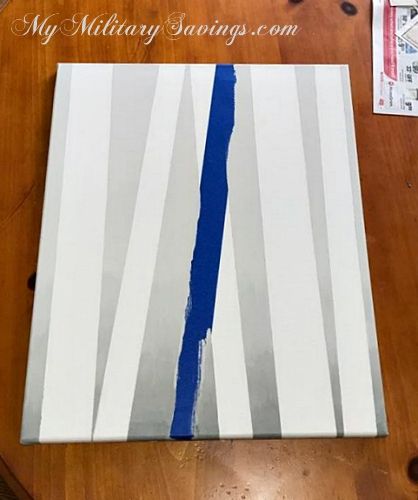
1) Place tape down to create your tree trunks. Stick two pieces side by side to create thicker trunks, place some at a slant, and even crisscross one or two to add a little depth to the picture. Turn your canvas over once this is done and smooth it out firmly to make sure the tape is adhered completely at the edges.

2) Paint the background of your picture. You may choose to use bold colors, a pigment that matches the color scheme in your room, or a neutral tone. I chose a very light grey but decided to do a reverse ombré at the bottom with darker grey colors.
I had grey acrylic paint but decided that I wanted a much lighter shade for my background so I added white to the grey to create the perfect color. To create the reverse ombré I added black to the plain grey acrylic paint to mix the darkest shade that I wanted to have at the very bottom of my canvas. I dabbed this dark grey color at the very bottom and blended it upwards with a dry paintbrush. I then added a touch of white to that dark grey paint to lighten it a bit and I painted this color right above the dark grey on my canvas, again blending upwards with a dry brush and blending down as well. I added a touch of white twice more and repeated that process until I had created the look I wanted. This reverse ombré reminds me of peering through the forest and seeing the sunlight pierce the sky towards the top of the canvas, but as you look deeper into the forest and lower towards the ground the light diminishes and it is more damp, cold, and earthy. Man, I can almost smell it. Tree hugger here, I told ya!

3) Once your background has dried, remove the strips of tape. If you crisscrossed any, only remove the top strip at this point.

4) Begin painting with your credit card! The fun part 🙂 Before attempting this on your canvas I would suggest a few practice strokes on a piece of paper to understand how exactly this works. It all depends on how hard you press, how much paint you apply, how far you smear, etc. It’s simple, don’t get me wrong, but practice never hurts. As you see in the photo below, apply paint to the edge of your card and then place the card straight down on your canvas at the edge of your tree trunk. Then turn the card sideways and smear inwards.

Play around with the paint. If you add a lot to your card, you will end up with thicker smudges. You will want to alternate between both thick and thin paint to get a realistic birch tree look.

5) If you had crisscrossed any tape to give the appearance of a tree resting behind another tree, you should still have that last piece of tape on your canvas as I described in step 3. Once all of your tree trunks have been painted you will then remove that final tape strip and paint it as well. This will become the tree trunk that is farthest in front.

Step 6) Once your paint has dried, you will have a beauty similar to this! Now you can stop here or you can choose to add a little decorative heart like I did, perhaps with your name or your and your spouse’s initials? You know, like a carving in a tree that young sweethearts tend to do. 😉

I actually already have a tree painting with my husband’s and my initials (but it isn’t a birch tree… aha!) so I decided to add a heart with our anniversary date instead. I traced it with pencil on the largest area of tree trunk that was unpainted and I used a small paintbrush and gold acrylic paint to cover it.

NOW my masterpiece was finished!

Let’s be honest – I never would have thought to paint trees with a card until I came across Angela Anderson’s blog (view it here). I know artist knives exist for similar reasons of just slabbing paint on a canvas (like, to add dimension to a mountain or something… google Bob Ross, you’ll see what I’m sayin’!) but this handy dandy card technique had me in awe. Now the possibilities are endless… I have so many ideas fluttering through my head! Stay tuned and perhaps I’ll be sharing more soon!
For more DIY projects and fun family crafts, visit MyMilitarySavings.com!


