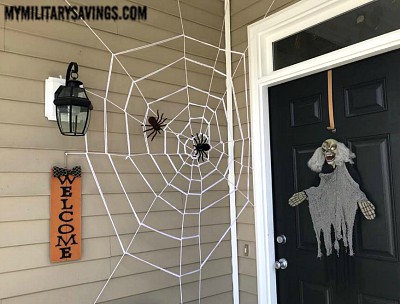
🕸️🕷️ With every change of station in the military, every house is different. That’s a no-brainer, right? Sometimes you have a yard, you may or may not have a porch, and occasionally half of your belongings stay in storage because you hardly even have a house! (Just me?? Hah!) And along the beautiful path that we call military life, you acquire so many different things from different places… that has high potential to get broken every time you have to pack up and relocate.
Where am I getting at with this, you ask? Well… I currently have no yard, I have a very awkward shaped porch, and the gorgeous Halloween and fall decor that I’ve collected from around the world is either completely missing or hidden away in the dark corners of our attic that neither my husband or I can locate. I refuse to buy new decorations (at least until they are all 75% off after this Halloween season, hehe!) so we have been winging it with a ton of DIY crafts this season. I do have a fun inflatable, 5 foot witch for the yard… that was tucked into our Easter decoration box!?… but we have no yard to set it up in. So I’ve got a porch. A funny looking porch. That’s all I have to work with. So whadaya do!?? 🕷️🕸️
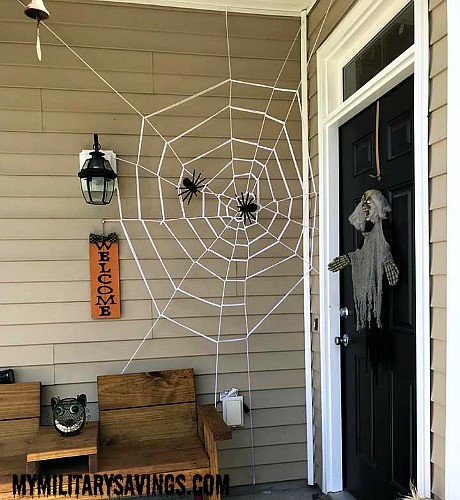
You make your own spider webs out of yarn, that’s what! It’s easy, cheap, and you can build it to fit any space that you have. You only need these 3 things: white yarn, heavy duty tape, and fake spiders from the dollar store!
🕸️🕷️ Start out by taping pieces of yarn into an X shape, and then add another strand going straight down through it. I’d suggest taping the yarn to objects that stick out from your porch to give the web some dimension (see the photo below – I taped the yarn to a bench I have instead of taping it straight to the wall, so it would *pop* out at ya!)
🕸️🕷️ Add more strands through your “X” base diagonally and horizontally, going every which way. Make it as full as you’d like.
🕸️🕷️ When you are ready to build the inside of the web you will start doubling your yarn up. I held up the yarn at the center of the web and took a quick guesstimate of how much yarn I’d need to make the smallest circle at the center and then I added a few inches to that.. it’s better to have too much than too little. I then doubled the length because you will fold the strand of yarn in half to double it up. To begin creating the circle, hold the folded end of your strand under one of the pieces of yarn that you already have taped up, towards the center. Take the tail end of your strand and feed it through the loop where you folded it to tie itself around the strand that you have taped up. It’s not nearly as confusing as it sounds – see the photo below to see just what I mean.
Then simply move your double strand from each piece of the web to the next piece, just wrapping around each web strand as you go without securing with any knots. When you get to the end and have completed a little circle, just tie off in a knot. (See photo above.) 🕸️🕷️
Repeat with larger and larger circles until you are satisfied with the size of your web!
🕸️🕷️ Add some fun spiders (I found mine at the local dollar store!) and just entwine the legs into the yarn. No glue or tape necessary!
Then I reevaluated the inside of my house searching for the perfect place to build another one and I realized… I didn’t need to. The cobwebs in my home have now become decorations. Thanks Halloween!! 🙂
🕸️🕷️ I’d love the see the creations you come up with! Share your yarn spiderwebs in the comments below!!
For more creative Halloween and fall-themed crafts, visit MyMilitarySavings.com!!


