There’s a lot of beauty to be discovered in those old, dirty, seemingly useless pallets that you see sitting behind workshops or by the dumpsters. If you are willing to put just a little ‘ole fashioned elbow grease into taking them apart, the projects you can create with them end up with such a fantastic, rustic charm. There’s something about raw wood that just screams home, comfort, kick-your-feet-up and get cozy to me. If that’s not your style, then pallet wood can easily be sanded and painted for a more finished look. Either way, making furniture with pallets is a fabulous way to repurpose and recycle, and if you can get a pallet for free then even better! You can give your space a new statement piece without spending hardly anything!! Think a $100 hanging wall shelf from some fancy furniture store ORRRR a $5 shelf (cost of nails or screws!) that you put together yourself. Which would you choose?? I bet you can guess what my answer is!
I found a random photo of some shelves online and decided to recreate it without a tutorial. I was able to complete the entire project from start to finish in one afternoon and the satisfaction I get every time I look at it in my home is indescribable. If you are used to carpentry work then that may not be a big deal for you but coming from me, someone that needs to read instructions to put together a plastic table, this was a huge accomplishment! And that is why I am sharing the idea… if I can do it, I know it is absolutely possible for anyone else to as well. If you are interested in how I created my DIY Pallet Hanging Wall Shelves, read on…
The only things I needed were:
- an old pallet, disassembled
- circular saw
- 2 inch wood screws
- electric drill
- sand paper
- wood stain
- paint thinner (optional)
- 3 hook screws (optional)
Step 1) When disassembling the pallet you will need to keep the wider slats, also known as top deckboards, usually located on the very ends of the pallet (see photo below, black arrow) and the supporting pieces underneath the slats, also known as stringers or runners (see photo, red arrows).

Step 2) Collect the wider slats or top deckboards and give them a good scrub under the water hose to remove dirt or debris. Arrange along the ground in a pattern that you prefer – I chose to stagger my pieces as shown in the photo below. I also did not trim off any length, I left them completely as they were. *Note- You do not HAVE to use the wider slats of wood. For a nice sized hanging wall shelf you could substitute the 3 wider pieces with 4 thinner slats instead.

Step 3) Use the supporting pieces, or runners, from the pallet to figure out your shelving. These supports have indentations in them that if used, will reveal that your masterpiece is indeed made from a pallet when you are all said and done. So I measured each shelf to connect across at least 2 slats and then my very bottom shelf went across all of them. This is how you will join and keep your back boards together, simply with securing your shelves (next step).

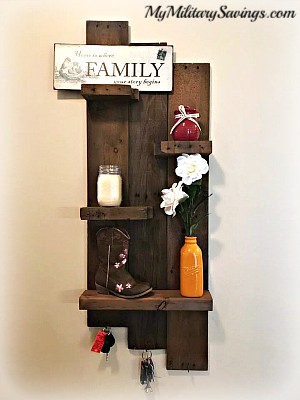
Saw all of your shelves to fit how you want. Notice I made sure that those indentations show on my shelving (see the left side of the 2nd shelf from the top, and the right side of the very bottom shelf.)

Step 4) This step is a little tricky. Now that you have everything lined up on the ground the way that you want it… you have to flip it all over backwards to secure it all together. Flip it over, line everything up, and then use an electric drill to insert screws making sure to put a screw in each deckboard so the shelves essentially are the only thing holding this entire piece together.

Step 5) Once it’s all assembled, it’s time to stain!! I lightly sanded the edges of my shelves first – this is meant to be a display shelf in my home and won’t be used or disrupted so I wasn’t that worried about splinters. I didn’t want to use a straight stain because I wanted to see the natural marks in the wood so I thinned it out with paint thinner. I always choose the darkest stain I can (in this case, dark walnut) because you can add more layers to make something darker but it’s harder to make something lighter once you get it too dark. If you do mess up and stain any furniture entirely too dark, you can usually sand it off and then reapply. So one layer of a paint thinner and stain combo and I was done. Let it dry out!!

Step 6) I added a hook screw to the very bottom of each of my back boards to hold car keys and such. This is totally optional.

Step 7) Gather some cute knick knacks to display!

Yes, that’s a cowgirl boot on my shelf and yes, there’s a story behind it. 🙂 It is my preschooler’s old shoe and I had set the pair aside to drop off at our local thrift store along with some other items. My father came over to visit and thought those boots were sooo cute, he talked me into keeping them “for some project.” I am so glad that he did because they are precious, and I think it fits on my bottom shelf perfectly!! Think outside of the box when finding treasures for your shelves.
I’d love to see how your pallet projects turn out! Share your photos in the comments below!
For more fun DIY projects, follow me at MyMilitarySavings.com!
In case you missed it, I made an Americana star from a pallet last month, too! Check it out here!