Spring has officially begun as of March 20! Here in Georgia I’ve got my flowers planted, my bird feeders are full, and we spend our afternoons outside in the warm southern sunshine. I’ve never been happier to see winter go! My jackets and boots are put away, I’ve got all of my spring decor out, and I’m starting to work on my tan, or, ehhh, trying to anyway. These legs have been porcelain for so long that a golden glow seems light years away. But anywayyy, in other news, I’m also updating my wardrobe for some new, spring funkiness! Goodbye dull sweaters – hello bright colors!
This DIY tie dye project was something that’s been on my to-do list for YEARS. My daughter went to a birthday party and they made fancy pillow cases with an actual tie dye kit but my kiddo came home and reminded me that I had promised I’d make tie dye shirts with her using permanent markers that she could make designs with… isn’t it funny how they conveniently forget to do the things you ask them to do multiple times, but suddenly they can also recall something you may have said, I dunno, BACK IN 2015!? That’s seriously when I first mentioned this tie dye shirt thing to her. And well, yeah, that’s how this came to be. We got to work right away!
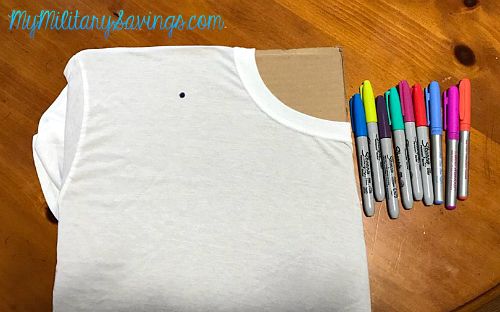
This DIY requires a few basics that you very likely already have laying around the house.
- Different colored permanent markers
- Rubbing alcohol
- White t-shirt
- Piece of cardboard
- A small dropper
- Cup (optional)

The fun part is coming up with any wild design your heart desires! Place the cardboard between the front and back of your shirt to prevent the marker from soaking through and create dot patterns making sure not to place the dots too closely together because the ink will spread and you want to be able to see and enjoy each color. Be mindful of colors that will look good when bled together – yellow and orange, blue and purple, etc. Using complimentary colors too closely together may end in a muddy looking mess. My favorite color combinations were fuschia with red and turquoise with green!
We threw in some lines and swirlies but the dots turned out the best. Use a variety of large and small dots! 🙂

Once you are through drawing, you will drop rubbing alcohol onto the middle of your designs to get the colors to spread out into a tie dye effect! Using a cup may make this process a bit easier for you if you made circular patterns. Secure the shirt around a cup using a rubber band (or just hold it taut with your hands) and drop a few splatters of alcohol smack dab in the middle of the design. You see my cat below amazed with this technique (he’s so nosy!)

To get the colors to spread out farther, add more alcohol to the center of your design. The faster you drop, the easier the ink will spread without being absorbed by the cotton.

Once you are satisfied with your tie dye job, remove the cardboard and put your shirt in the dryer for 20 minutes to set the marker. Then put it on and ROCK IT! You now have an absolute one-of-a-kind piece that SCREAMS “I am ready for some warm weather and fun!!” Right?? Right.

I’d love to see your creations!!! Post your DIY tie dye photos below!!
For more fun family crafts, visit MyMilitarySavings.com.
Happy Spring, y’all!! <3